Chirag's Blog
How to Register Users in Django REST Framework?
October 1, 2024
Django REST Framework (DRF) is a powerful and flexible toolkit for building Web APIs. One of the most common requirements in web applications is user registration. In this article, we'll explore how to implement user registration using Django REST Framework.
Setting Up Django REST Framework
Before we dive into the Django REST Framework, let's set up a new Django project. Follow these steps:
-
First, ensure we have Python installed on our system. We can download Python from python.org.
-
Install Django and Django REST Framework using
pip:
- Create a new Django project:
- Create a new Django app:
- Open
django_rest_demo/settings.pyand add theuser_authandrest_frameworktoINSTALLED_APPS:
- Run initial migrations:
Now that we have our Django project set up, let's configure Django REST Framework:
- In the
django_rest_demo/settings.py, we can add any DRF-specific settings. For example:
- If we're using token authentication, make sure we've added
rest_framework.authtokentoINSTALLED_APPSas shown in step 5 above.
Here's how our project structure might look:
Creating a Registration Serializer
Serializers in DRF allow complex data, such as querysets and model instances to be converted to native Python datatypes that can then be easily rendered into JSON, XML or other content types. They also provide deserialization, allowing parsed data to be converted back into complex types, after first validating the incoming data.
Let's create a serializer for user registration: In the user_auth/serializers.py:
This serializer extends ModelSerializer and uses the User model. It includes a password confirmation field and custom validation to ensure the passwords match.
Handling User Registration with Views
Now that we have our serializer, let's create a view to handle the registration process. In the user_auth/views.py:
This view uses the UserRegistrationSerializer to validate the incoming data and create a new user if the data is valid.
Example Code
To complete our code, let's set up the URLs to make our registration view accessible.
In our user_auth/urls.py (create this file if it doesn't exist):
Then, in the project's django_rest_demo/urls.py:
Testing the Registration Endpoint
We can now run our Django development server:
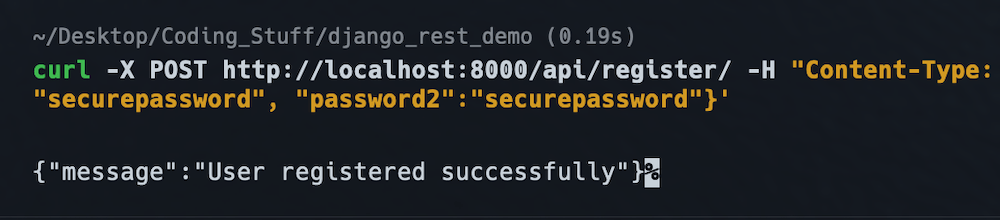
To test the registration endpoint, we can use tools like curl, Postman, or even the Django REST Framework browsable API. Here's an example using curl:
If successful, we should receive a response indicating that the user was registered successfully.
Conclusion
In this article, we've covered how to set up a Django project named "django-rest-demo" from scratch and implement user registration using Django REST Framework in an app called "user_auth". We created a custom serializer to handle the registration data, including password confirmation and validation. We then created a view to process the registration and return appropriate responses.
This implementation provides a solid foundation for user registration in our DRF project. Remember to add appropriate permissions and authentication to our views as needed, and consider adding features like email verification for a more robust registration process.